
What other platform can help you reach more than 2.3 billion people around the world? Facebook has become a digital marketing powerhouse, and that’s especially true when it comes to advertising. The multitude of targeting capabilities combined with the ability to run a campaign on even the most limited budget makes Facebook a marketing tool not many businesses can find irrelevant.
To achieve results, of course, you have to understand the platform. Facebook’s internal tool, Ads Manager, is relatively intuitive but still complex given its many capabilities and features. These five steps can help you build your first campaign and run Facebook ads that move your business forward.
Step 1: Log In to Ads Manager and Create Campaign
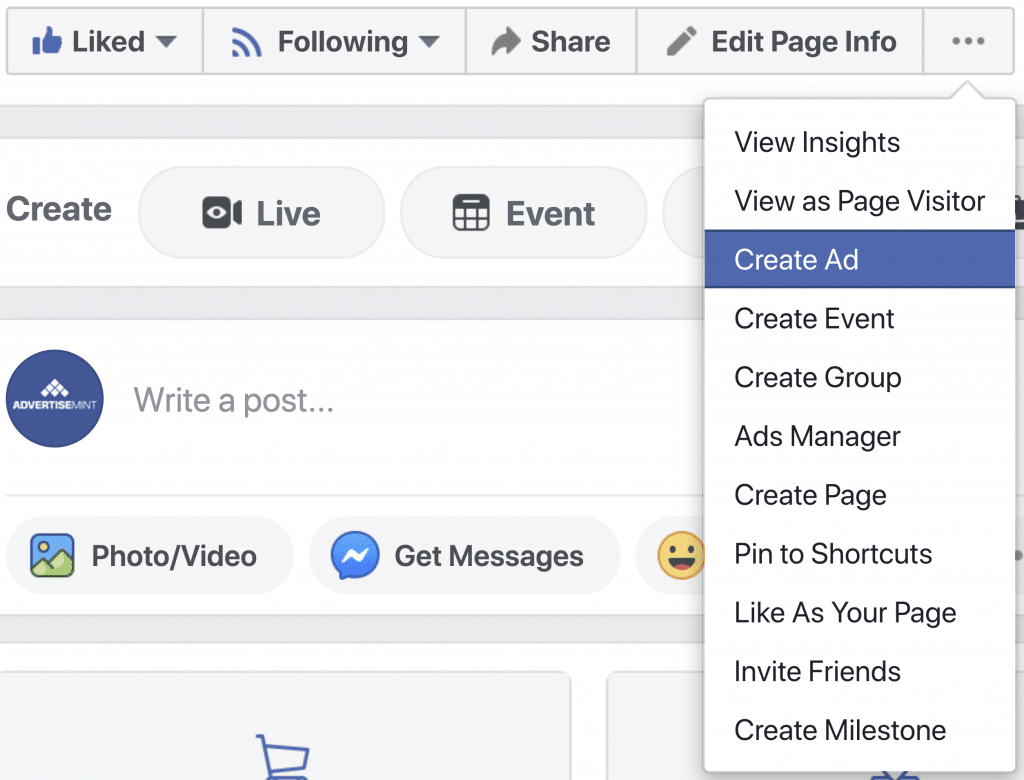
The first step is the easiest: Navigate to Facebook Ads Manager. You can reach it via direct link or by clicking “Create an Ad” directly on your Facebook page.
You’ll find the green “Create” button clearly marked to start your campaign on Ads Manager. Before you dive in, it’s important to understand the three levels of advertising that dominate the entire Ads Manager setup:
- Campaigns is the first level of Ads Manager. It is the overarching structure where you choose your objective.
- Ad sets, the second level, allows you to target audiences, choose your budget and schedule, and enable your placements. Each ad set can hold multiple ads.
- Ads, the third and final level, allows you to choose your media and ad format, write your copies, and enable your Facebook pixel, a code that tracks users’ online activity.
To start your campaign, click the green “Create” button. If you’ve never created one using Ads Manager, you’ll also find that button in the center of your screen.
Step 2: Set Your Objective
The first thing you’ll have to choose as you create your campaign is the objective. You can choose one of three umbrella goals. Each comes with a variety of subgoals:
- Awareness includes objectives for both brand awareness and ad reach.
- Consideration includes website traffic, ad clicks, engagement, app downloads, video views, new leads generated, and new direct messages to your page.
- Conversionincludes lead and purchase conversion goals, catalog sales, and traffic to your online or Facebook store.
Each objective will help you achieve specific goals:
- Brand awareness increases awareness of your brand by showing ads to users most interested in your business.
- Reach shows your ad to the maximum number of people.
- Traffic sends users to your chosen landing page, such as a Messenger conversation, a website, or an app.
- Engagement increases your post or event engagement, including likes, comments, and RSVPs
- Messages brings users to your Messenger or WhatsApp conversation.
- Conversions shows ads to users most likely to commit a desired action, such as making a purchase or downloading an app.
- Catalog sales creates ads that automatically show users products from your catalog.
- Store traffic drives people to your nearest brick-and-mortar store.
You can only choose one objective, and that choice is consequential. Facebook will build a number of optimizations, from budget to audience, into the campaign depending on what you choose. Your analytics reports will also be customized based on your choice. The platform will also give you a suggested ad type to build, although you can customize that later.
Step 3: Enable Special Ad Category
In the past, advertisers have used Facebook’s ad targeting tools to create ads that discriminate against a specific group of people. To prevent such unlawful practices form occurring in its platform, Facebook rolled out Special Ad Category, which you must enable if you are running credit, employment, or housing ads. By enabling this tool, Facebook will remove ad targeting options that could be used for discrimination, including age, gender, and race. Turn on Special Ad Category only if you plan to run credit, employment, or housing ads.

Step 4: Choose Your Target Audience
Perhaps the most exciting but also complex part of building any Facebook ad is the audience you choose. In total, the platform offers more than 200 targeting options, ranging from custom lists to recent purchasing behaviors. It’s easy to get lost, which is why sticking to the basics to start is important.
As you begin to select your audience, pay close attention to the audience-size meter on the right-hand side of Ads Manager. It shows you, based on your selection, how many users you can expect to reach, adding context to what can be difficult decisions. At the very least, it prevents you from getting too specific or too broad.
Start with the geographical area by selecting a state, country, or radius around a specific city or zip code. Then, narrow down your options based on what you know about your audience, which can include (but is not limited to) age, gender, education level, industry of work, interests, income level, relationship status, and recent behaviors.
For more advanced users, Facebook also offers custom audiences that forego the interest and demographic targeting in favor of either a custom list of your existing leads and customers, or retargeting to users who have recently visited your website. Inform yourself thoroughly about Facebook custom audiences before you leverage them for your own purposes.
Step 5: Choose Your Placements
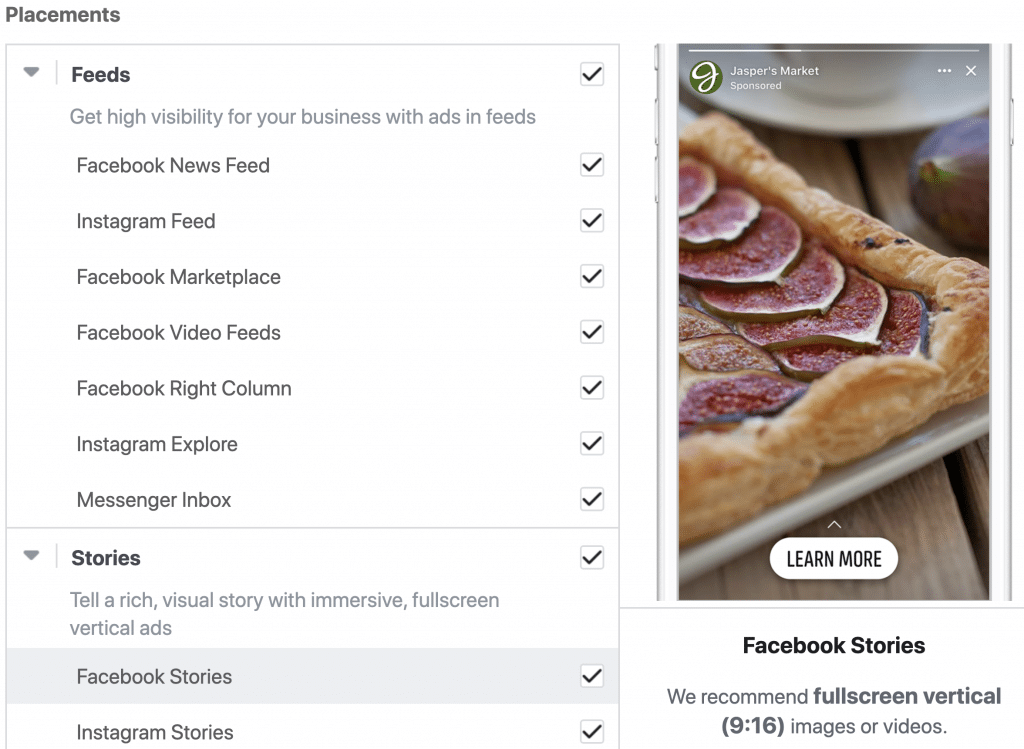
Placements are the areas where your ads can appear. If you choose automatic placements, Facebook will serve your ads to areas that is optimized for your objective and your budget. For example, if News Feed is a cheaper option than Instagram, Facebook will place your ads to News Feeds. If you choose edit placements, you must manually tick off the areas where you want your ads to appear. You have the following options:
- Facebook and Instagram Feeds
- Facebook Marketplace
- Facebook video feeds
- Facebook Right Column
- Instagram Explore
- Messenger
- Facebook, Instagram, and Messenger Stories
- Facebook in-stream videos
- Instant Articles
- Audience Network
To the right of your placement options is a preview tool that shows you what your ad will look like on each placement.
Step 6: Define Your Budget
On the next screen, you can set your budget based on either a lifetime (total) amount or a desired daily spend. Lifetime makes more sense if you have a defined end date, whereas a daily budget improves pacing if you look to build an ongoing campaign. For beginners, it’s best to stick with the more straightforward lifetime budget.
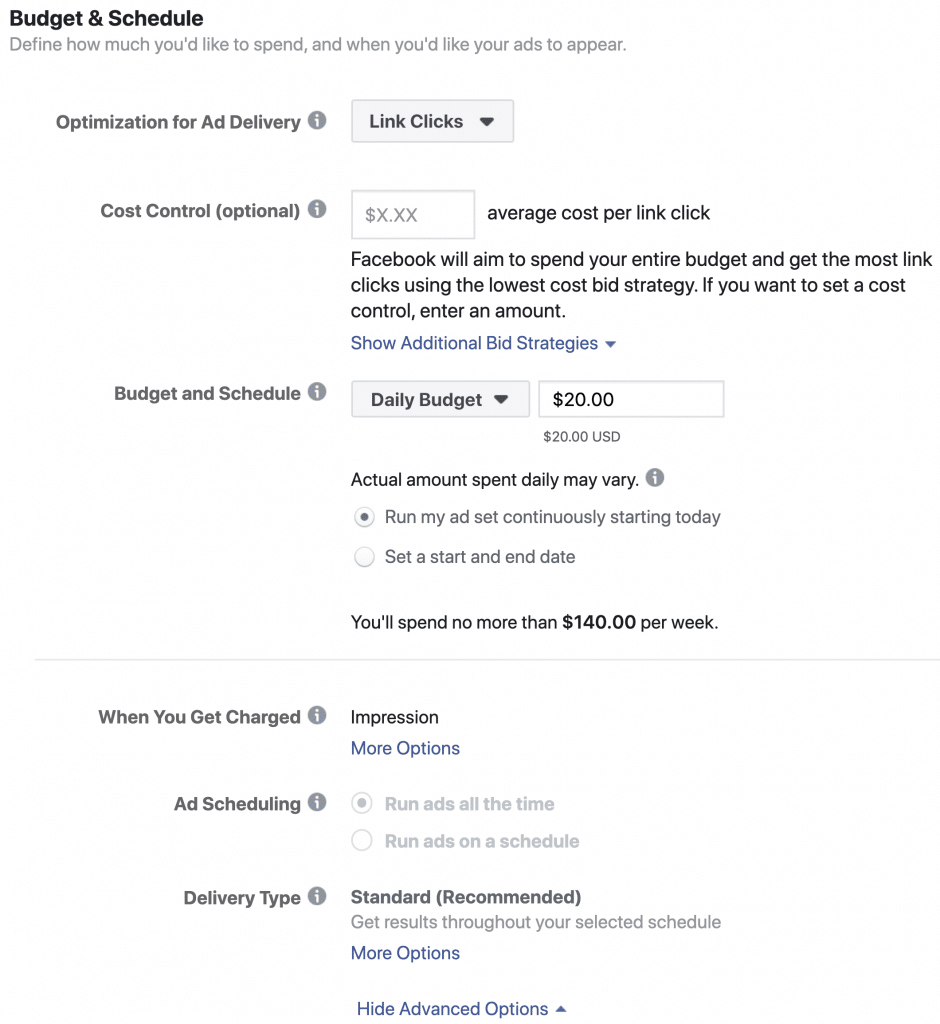
The rest of the budget screen is set automatically, which most beginners will appreciate. You can tinker with these options, which include defining your bidding strategy and building the schedule of times and dates during which your ads should run.
Step 7: Create Your Ads
Finally, it’s time to get creative. Once the budget is set, you get to create your ad based on a number of predefined types Facebook’s ad formats range from simple link ads to carousel ads and videos, and Facebook will recommend the best option for you based on the objective for the campaign.
The most popular ad types are link (with a single image and large headline) and carousel (with multiple rotating images, each with its own headline). Each comes with its own specifications for the space you have:
- Link ads require an image with a 1.91:1 width to height ratio, up to 125 characters of body copy, and a 25-character headline.
- Carousel ads require a square image for each carousel panel, up to 125 characters of body copy across the carousel, and up to 40 characters for each panel headline.
Design on the images should be minimal. Facebook will flag any ad that has more than 20% text included in the image. Ads Manager will show you how the ads will look on both desktop and mobile devices in real time, so you can make adjustments as needed to get them just right.
Don’t start with a single ad. Instead, create a set of three to four ads to rotate for each audience you build, increasing both variety and your ability to provide unique messaging. Over time, Facebook will automatically shift more money toward your top-performing ads.
Ready to Optimize Your Facebook Ads?
It might be complex, but it’s far from impossible. Facebook’s Ads Manager is built to be easy to learn but difficult to master. Jump in to get started, but know that the nuances can cause you to spend quite some time in the dashboard.
By Simon Stuchlik
